Building an All-Flash NAS from a Dell Precision 3460 SFF
After upgrading my main NAS with 10GbE and flash drives, I realized an even more compact, all-flash NAS was within reach. Around the same time, I discovered that many business workstation PCs offer mature and stable hardware, including desirable features like ECC memory support. As a fan of repurposing older hardware for its value and environmental benefits, I began my search for suitable compact PCs.
I ended up having the following shortlist, consisting of mostly W680 chipset-based SFF PCs. I've also embedded links to forum discussions or resources that inspired me or provided valuable information for each model:
I think P3 Ultras are the cutest SFF out there, but unfortunately refurbished and used ones are pretty pricy, plus they only support up to 3 disks. Notably, none of these SFF PCs support PCIe bifurcation, so you cannot just drop in a cheap PCIe to U.2/M.2 cards and add more drives to your system. That said, you can still add PCIe switches for more drives, which I'll cover later.
The next visually appealing SFF is the Dell one IMO, so I've been looking for suitable ones. Interestingly, a forum post I came across highlighted a crucial detail: 3460s ship with different motherboards. Some support vPro/AMT features and some don't (which is okay), but Dell apparently ensures none of these motherboards are compatible with newer CPU generations--a frustrating strategy to block upgrades.
Days later, I saw a listing on FB marketplace selling a Dell Precision 3460 SFF for $500, and I was able to get it for $400. I decided to get it fast because I checked the MoBo model from service tag -- it supports up to 13th Gen Intel CPUs and vPro feature.
Yet funnily again, I learned that MoBo model isn't the sole factor deciding the vPro/AMT feature -- if the machine isn't configured to have vPro/AMT when it was built, then the feature is permanently disabled. Essentially, this is the situation where hardware supports the feature, but it is not usable unless you pay extra to enable it.
This post will describe my experience in repurposing a Dell Precision 3460 SFF machine by modding its BIOS and extending its hardware. In Section 1, I will describe steps needed to enable the vPro/AMT feature. In Section 2, I will detail steps of extending the machine for more disks. In the rest of the post, I will list some options of NICs, PCIe switches, and flash drives.
1 Enable vPro/AMT
1.1 So, Why Bother With vPro/AMT?
For a headless server like a NAS, Intel vPro/AMT is a game-changer, equipping our compact PC with a subset of IPMI features. Its most standout feature is true out-of-band KVM (Keyboard, Video, Mouse) access, letting you remotely see the display, control the system, and even access the BIOS or reinstall the OS using a remotely mounted ISO--all without physical peripherals, even if the main operating system is unresponsive. This is incredibly valuable for troubleshooting, initial setup, or fixing a NAS tucked away in a closet.
Beyond full remote control, AMT also provides remote power capabilities (on, off, reboot), which is a lifesaver for frozen systems. Essentially, it brings enterprise-level remote management to repurposed hardware, minimizing physical intervention and making tasks like diagnosing boot issues or recovering a non-SSHable system vastly more convenient.
1.2 Background and Roadmap
Intel AMT relies on an onboard subsystem: the Intel Management Engine (ME). This ME is a tiny, autonomous co-processor integrated into most modern Intel chipsets, handling low-level tasks like the boot process, power management, and--crucially for us--hosting the firmware and logic for features like Intel AMT.
During manufacturing, Dell customizes and flashes a pre-configured firmware image to the system's SPI/BIOS chip. The chip hosts a few important configurations and programs: it stores the ME firmware and data, BIOS firmware and configuration, and some machine-dependent information like S/N and LAN MAC address. As you might guess, this ME configuration dictates whether Intel vPro/AMT features are enabled. If AMT is disabled here, the relevant BIOS options are typically hidden, preventing the end user from accessing the feature.
Our goal, therefore, is to modify the ME configuration (specifically within its data section) to enable AMT. However, directly editing these specific configuration bits is notoriously complex and error-prone. Instead, the widely adopted and recommended approach within Win-Raid is to clean the ME region. This process involves wiping the OEM-customized ME Region, consisting of both data and code sections, and replacing them with a stock Intel ME Region.
This cleaning process is precisely what we need, as it typically re-enables features like AMT by removing the OEM's specific (and sometimes restrictive) configurations, including what many see as vendor paywalls. This post on Win-Raid detailed how everything works and is a must read if you need to change your ME configuration too. However, that excellent guide primarily covers ME cleaning for versions 2-15, while our Dell Precision 3460 SFF uses ME version 16.1.35. Although the procedure is very similar to cleaning ME version 15, I'm detailing my steps here for specific reference.
At a high level, we need to do the following steps:
- Find and dump SPI/BIOS chip(s) on the motherboard
- Find a suitable ME firmware to replace
- Use Intel MFit tool to build a new image
- Flash the new image and reset the system
1.3 Find and Dump SPI/BIOS Chip(s)
Refer to this guide on using a CH341A SPI Programmer to dump/flash BIOS chips. Note that your PC might have multiple SPI chips, with the firmware distributed across them. In such cases, you'll need to dump each chip individually and then concatenate these dumps to create the complete firmware image.
For instance, 3460 SFF has two SPI chips: a 16MB SOIC8 chip (primarily for ME/USB-C/PMC firmware, which we'll dump as me-16m.bin) and a 32MB SOIC16 chip (for the main BIOS, dumped as bios-32m.bin) shown in the picture.
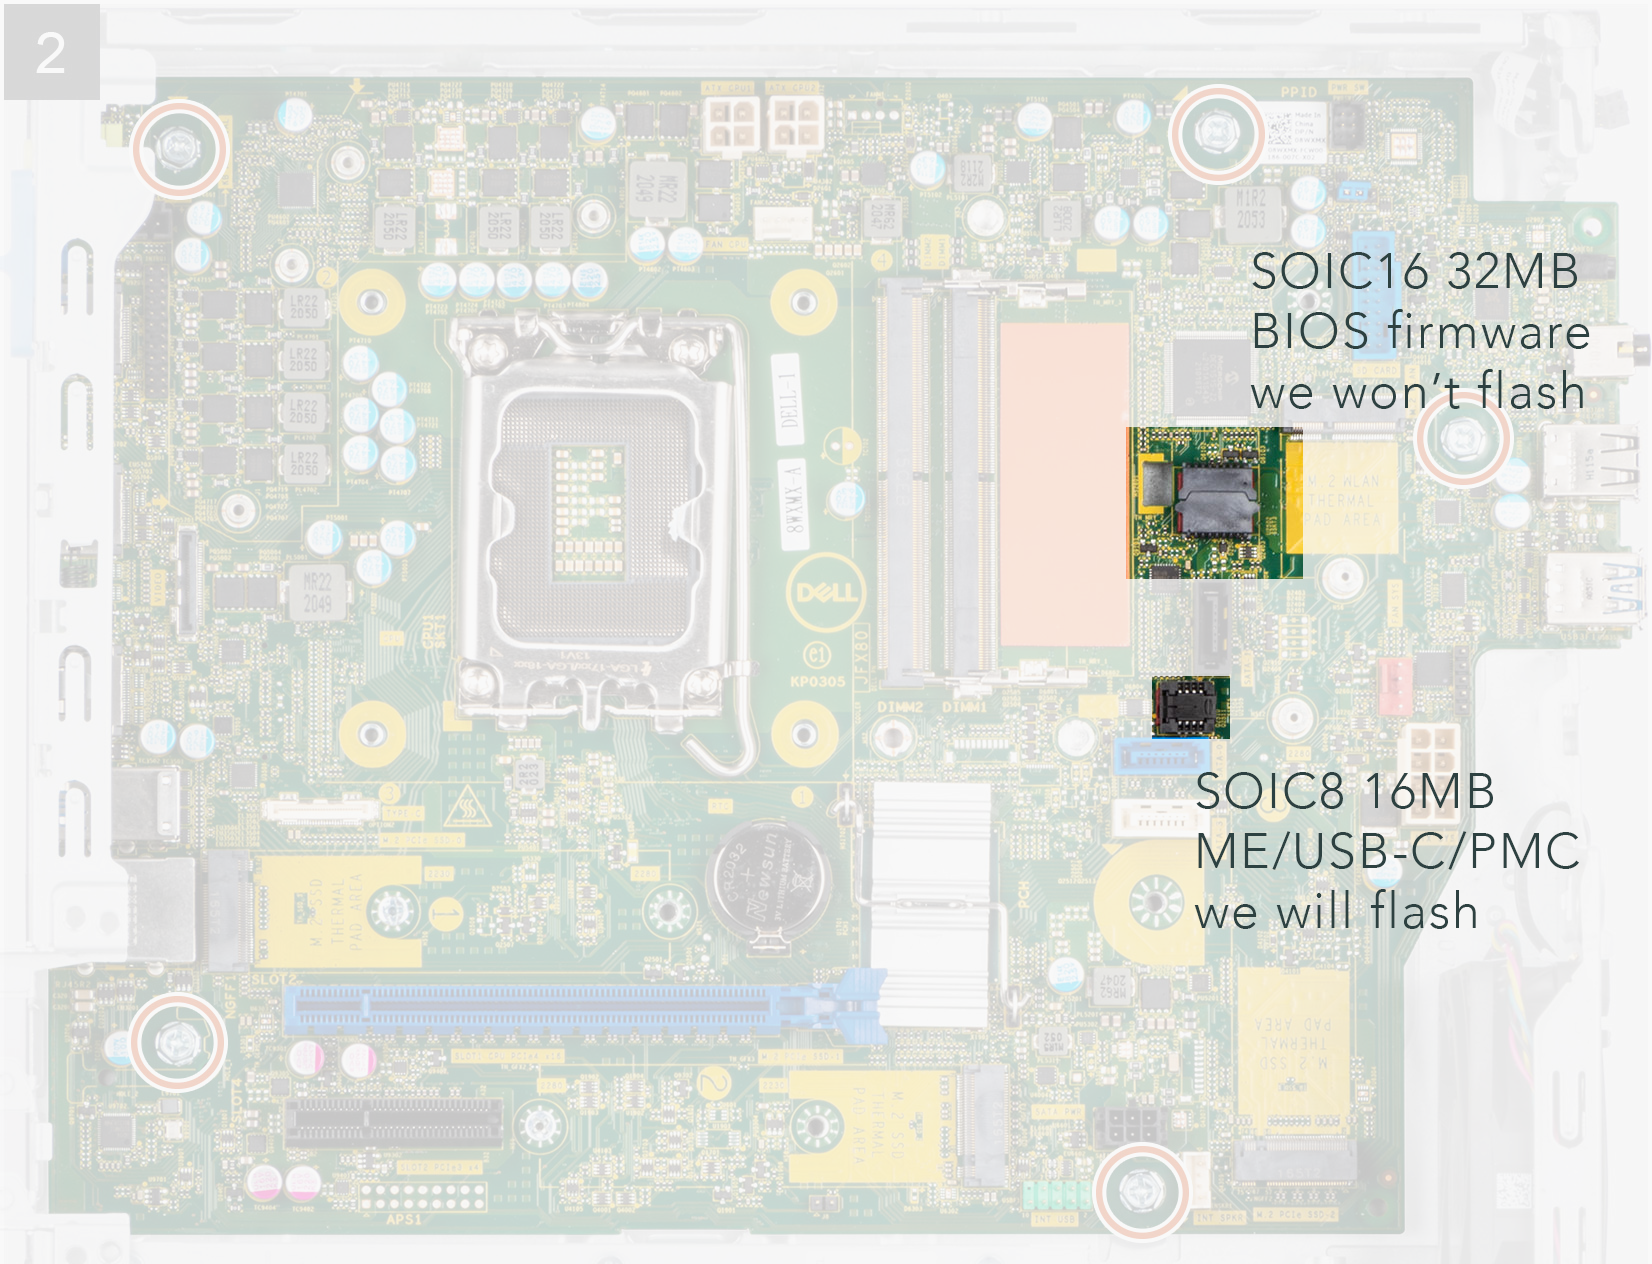
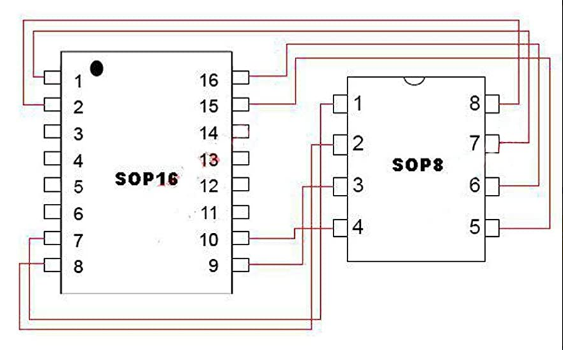
While CH341A programmers usually include a SOIC8 clip, you'll need to get a SOIC16 clip and use Dupont wires for the SOIC8 conversion if your programmer requires it. Here is the wiring diagram to connect a SOIC16 chip to a DIP8 socket.
We are ready to dump firmware using flashrom. Remember to always read multiple dumps from each chip and verify their integrity. At least two dumps from the same chip must have identical checksums to ensure a good read.
# dump the first chip, 16M SOP8
# flashrom cannot decide which model to use, so we need to manually specify one
sudo flashrom --programmer ch341a_spi -r me-16m.bin -c "MX25L12835F/MX25L12873F" --progress

# dump the second chip, 32M SOP16
sudo flashrom --programmer ch341a_spi -r bios-32m.bin --progress
After dumping both chips, I can obtain the merged full image by running
cat me-16m.bin bios-32m.bin > combined.binDon't worry about manually splitting the combined image for flashing later; the MFit tool will generate separate files if needed (e.g., image1.bin, image2.bin). If you were curious, the command to split would be split -b 16M combined.bin, but as mentioned, you likely won't need it.
1.4 Find the target firmware
As we discussed before, we want to change the DATA section of the ME Region. Per Intel's definition, there are three possible states for the DATA section, Unconfigured, Configured, and Initialized. According to the post,
Unconfigured means that the Engine firmware image is the stock one Intel provides and not configured at all (RGN). Configured means that the OEM has applied model specific settings and the Engine region is ready for deployment (EXTR). Initialized means that the Engine region comes from a system which was already running and thus the Engine co-processor has further configured the DATA section to suit that particular system better (system specific or dirty EXTR).
The image dumped from your machine likely has an Initialized data section, reflecting Dell's manufacturing configuration and changes from subsequent system operation. Our goal is to revert this to a Configured-only state, effectively removing the system-specific initialization.
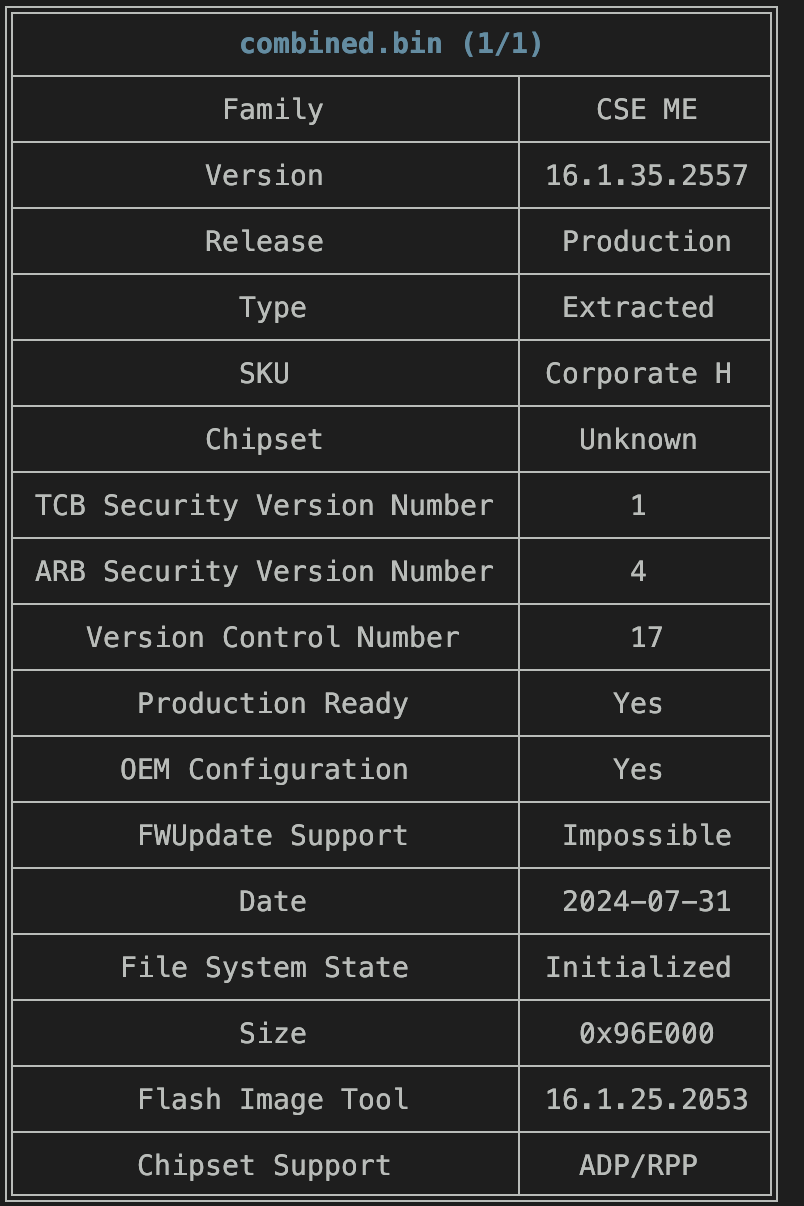
First of all, let's use MEAnalyzer to confirm our dumped image has initialized data section. In the screenshot below, you can check that File System State is indeed Initialized.
Next, we need to source a suitable replacement ME region (including both data and code sections) that is in the Configured-only state. For 3460 SFF, I was able to extract one from the latest BIOS update package published by Dell.
Extract ME Region from Dell BIOS Update. For this part, we will use BIOSUtilities (thank you again, platomav!) to extract firmwares from the update package.
python main.py -o . Precision_3260_3460_3.15.0_SEMB.exe

-----------------------------------
Precision_3260_3460_3.15.0_SEMB.exe
-----------------------------------

    -----------------------------------
    Dell PFS Update Extractor v25.04.02
    -----------------------------------

        Extracting Dell PFS 1 > Precision_3260_3460_3.15.0_SEMB > Utilities

        Extracting Dell PFS 1 > Precision_3260_3460_3.15.0_SEMB > Firmware

            Extracting Dell PFS 2 > ._Precision_3260_3.15.0 v0.0.7 > Utilities

            ...
The script will extract all bundled firmware from the update package into the specified output directory. This often includes firmware for several PC models, so navigate into the output folder to locate the one matching your specific machine.
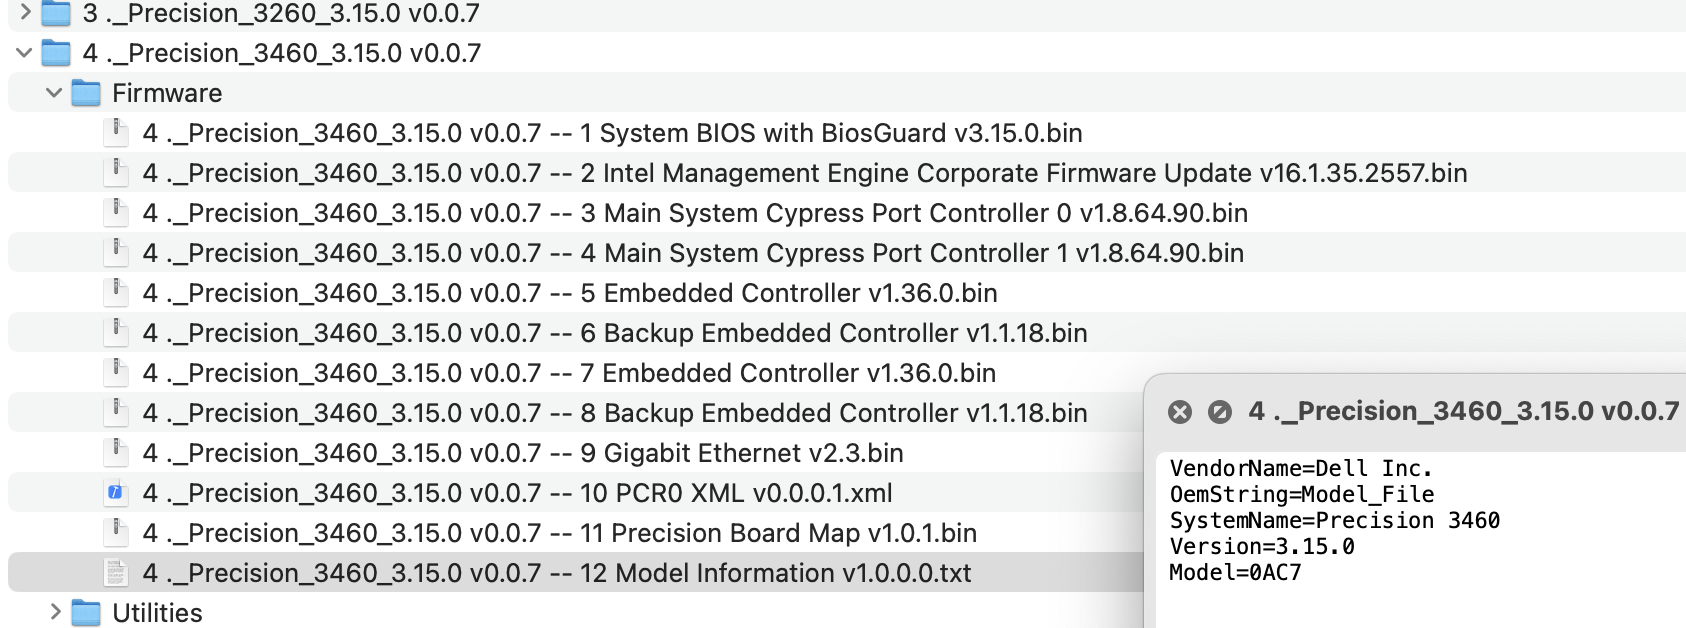
For this Dell model, the file named 2 Intel ME Corporate Firmware Update (found within the extracted Firmware directory) is the ME region we need. Let's verify its version and state using MEAnalyzer:
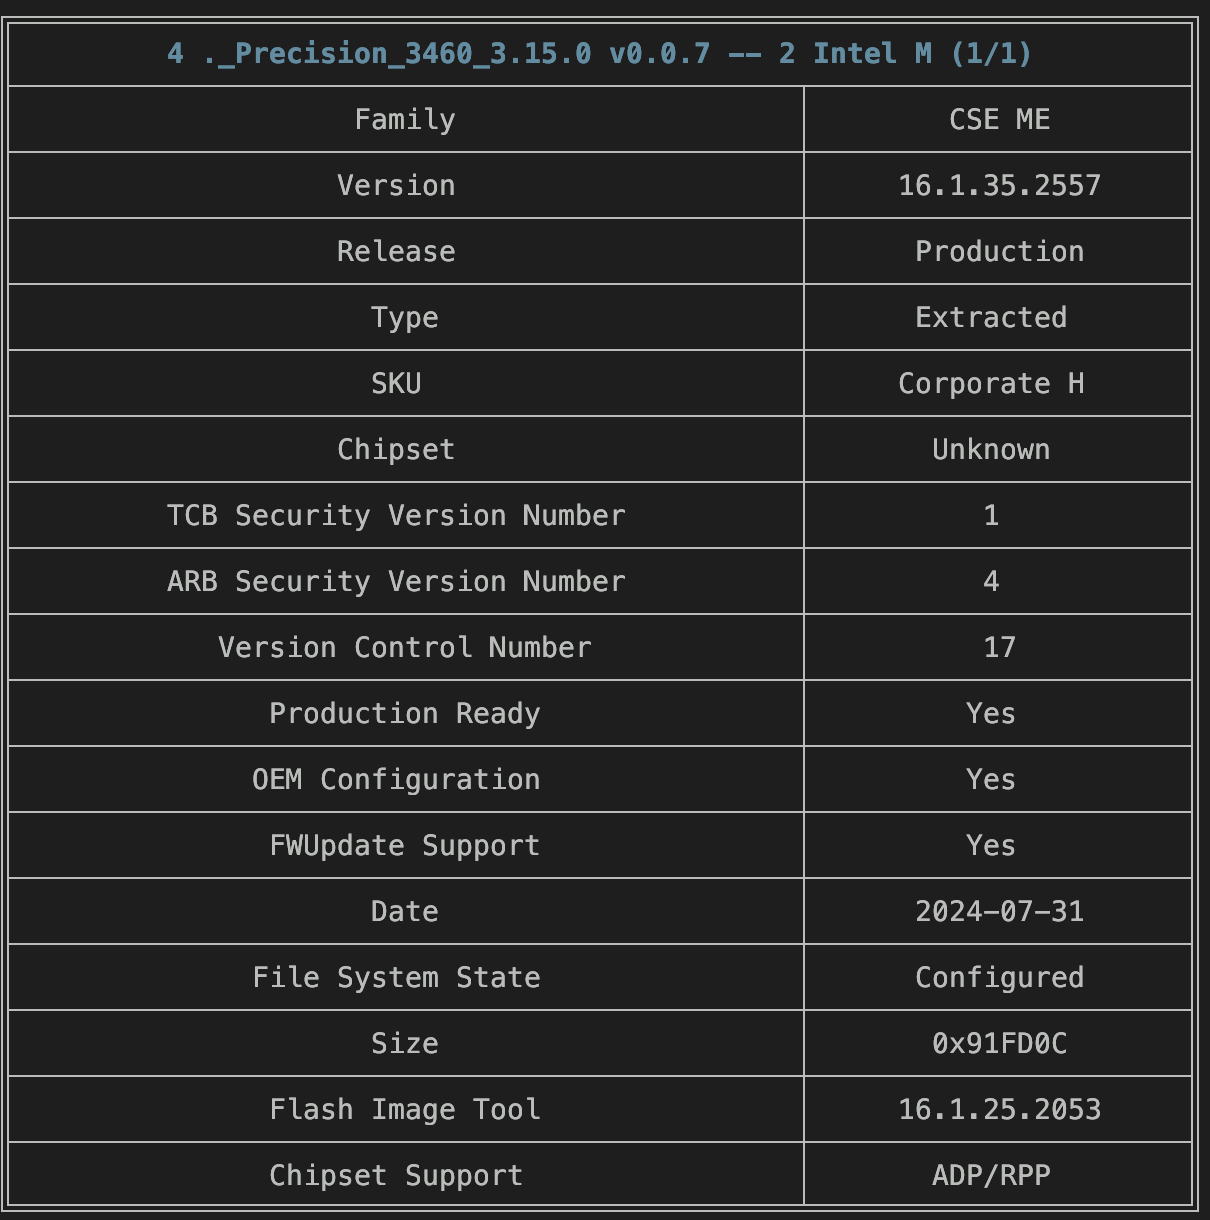
Voila! As confirmed in the screenshot above, the ME region is configured and has exactly the same version and SKUs as our dumped one. Keep this file and rename it to ME Sub Partition.bin.
1.5 Build the New Image with MFit
With our original dumped firmware (combined.bin) and the clean replacement ME region (ME Sub Partition.bin) prepared, we're ready to build the new flash image using the Intel Modular Flash Image Tool (MFit).
Thanks to @platomavfan, we can download and use Intel CSE System Tools v16.1.x r0 that comes with MFit version 16.1.25.2091.
After downloading the tools, locate and launch mfit.exe. Then, drag and drop the image combined.bin to MFit. You should be able to see that MFit decomposed the image and created a project.
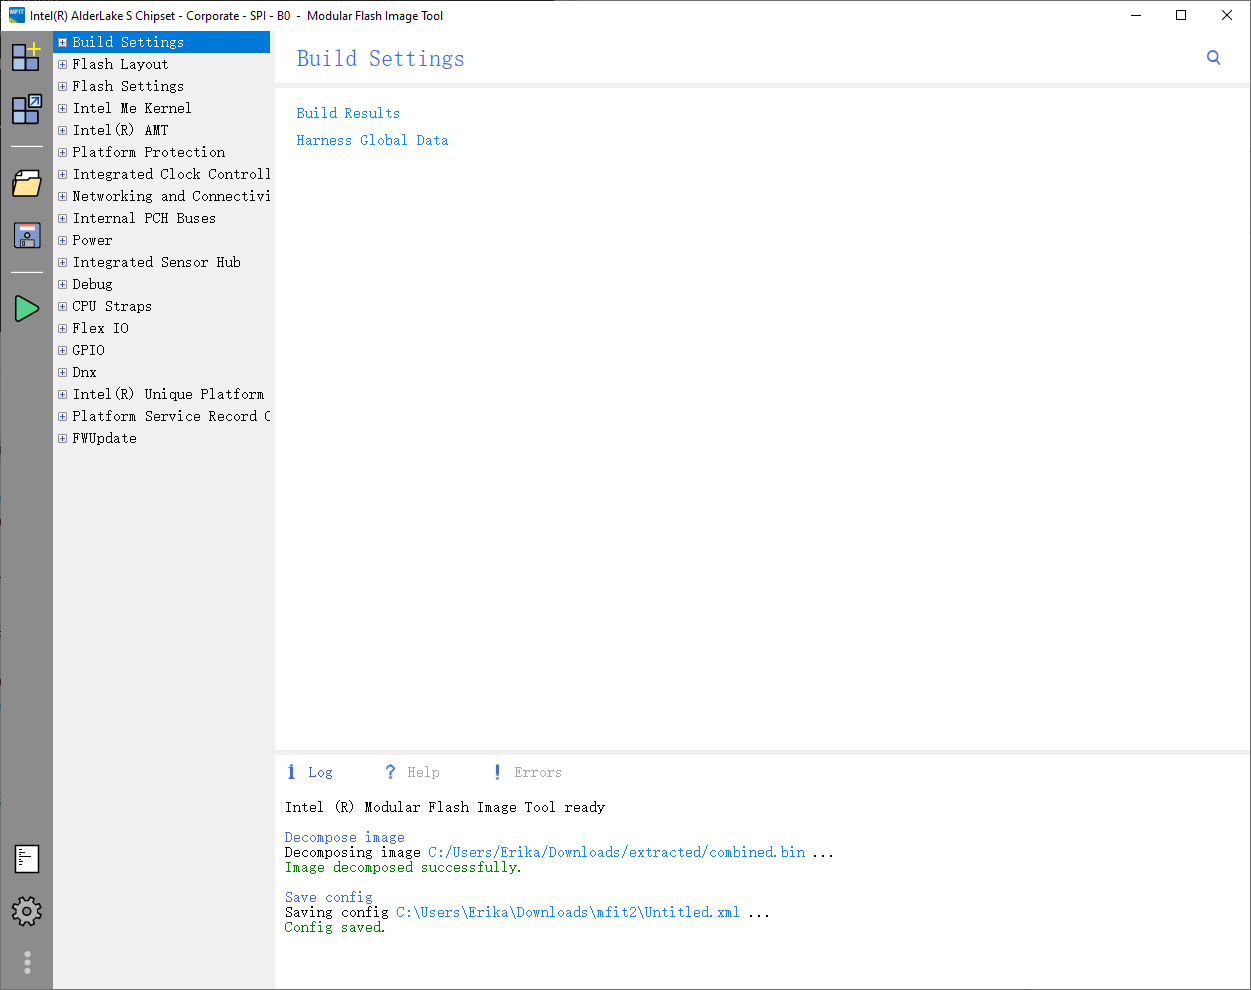
Click the save button (floppy disk icon) on the left sidebar. MFit will save the config file to Untitled.xml, which we will use later. Then, exit MFit.
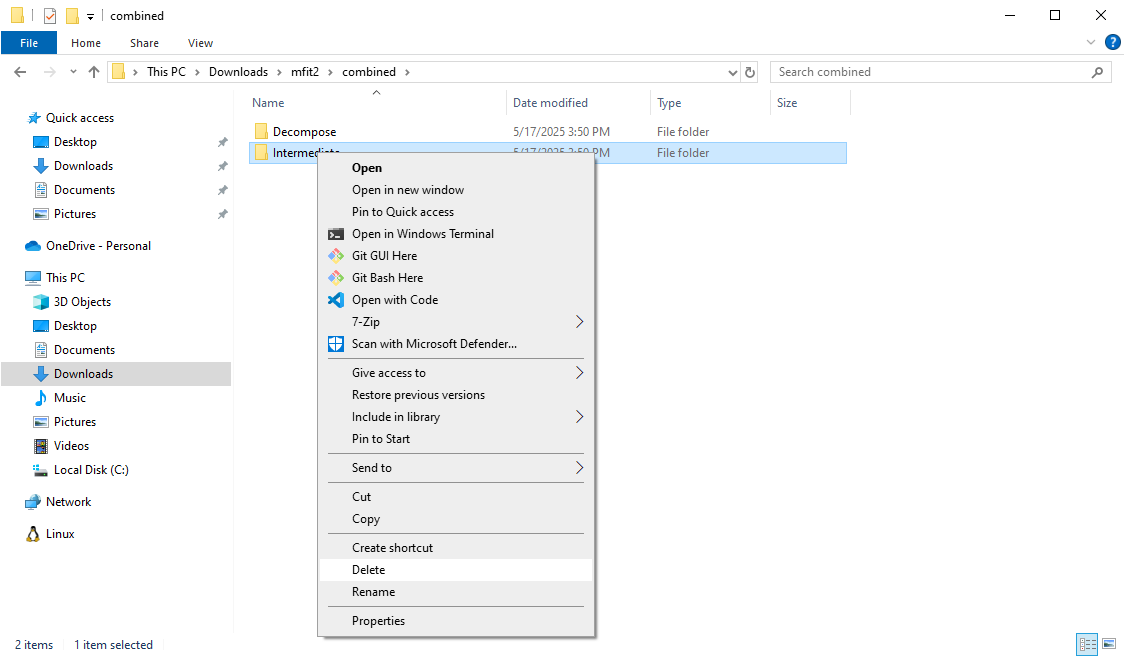
Delete the Intermediate directory. Navigate to where Untitled.xml was saved. Inside, you'll find a subdirectory named after your dumped firmware file (e.g., combined). Within this subdirectory, delete the Intermediate folder. This step forces MFit to use our newly supplied ME region when regenerating images.
Replace the ME Partition. Then, enter the Decompose directory, and replace ME Sub Partition.bin with the ME firmware we've extracted from Dell's BIOS update package.
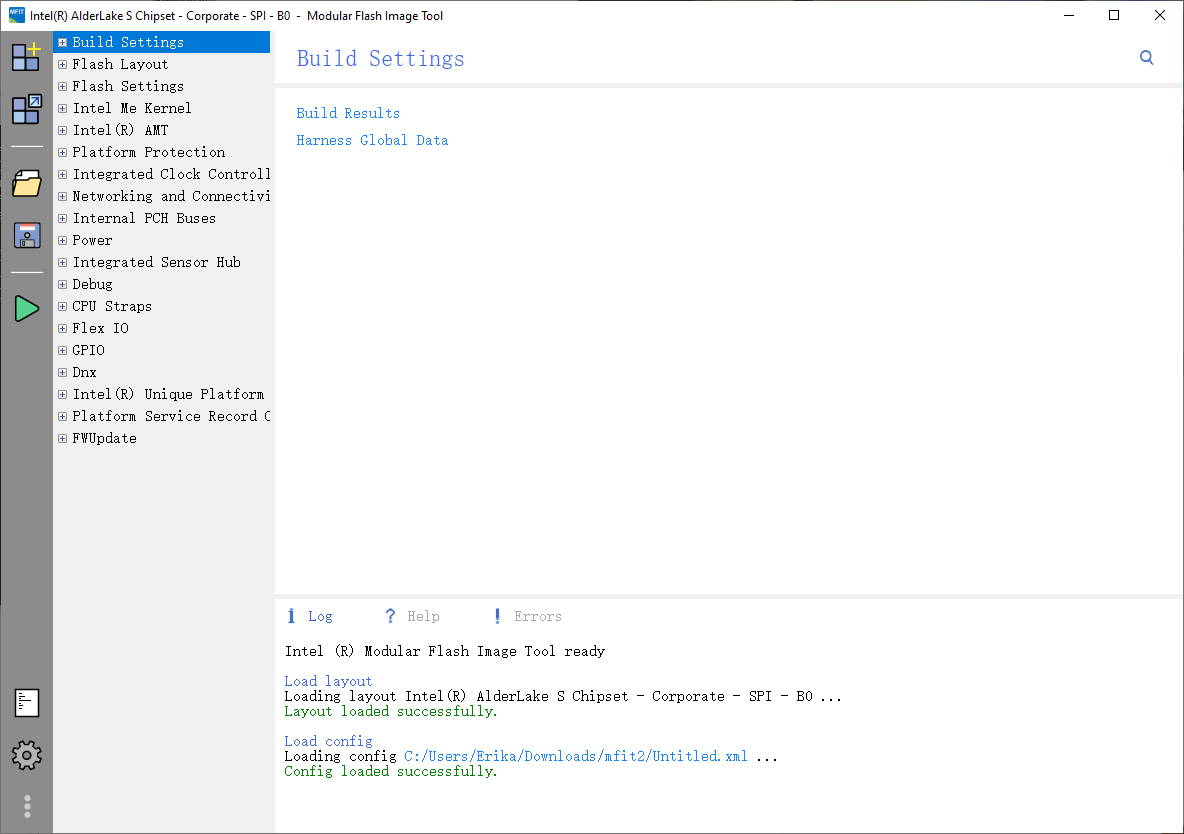
Launch MFit and Change Settings. Now launch MFit again and load Untitled.xml we've saved from previous steps. If the firmware (ME Partition) we've replaced is valid, you should be able to see the config loaded successfully.
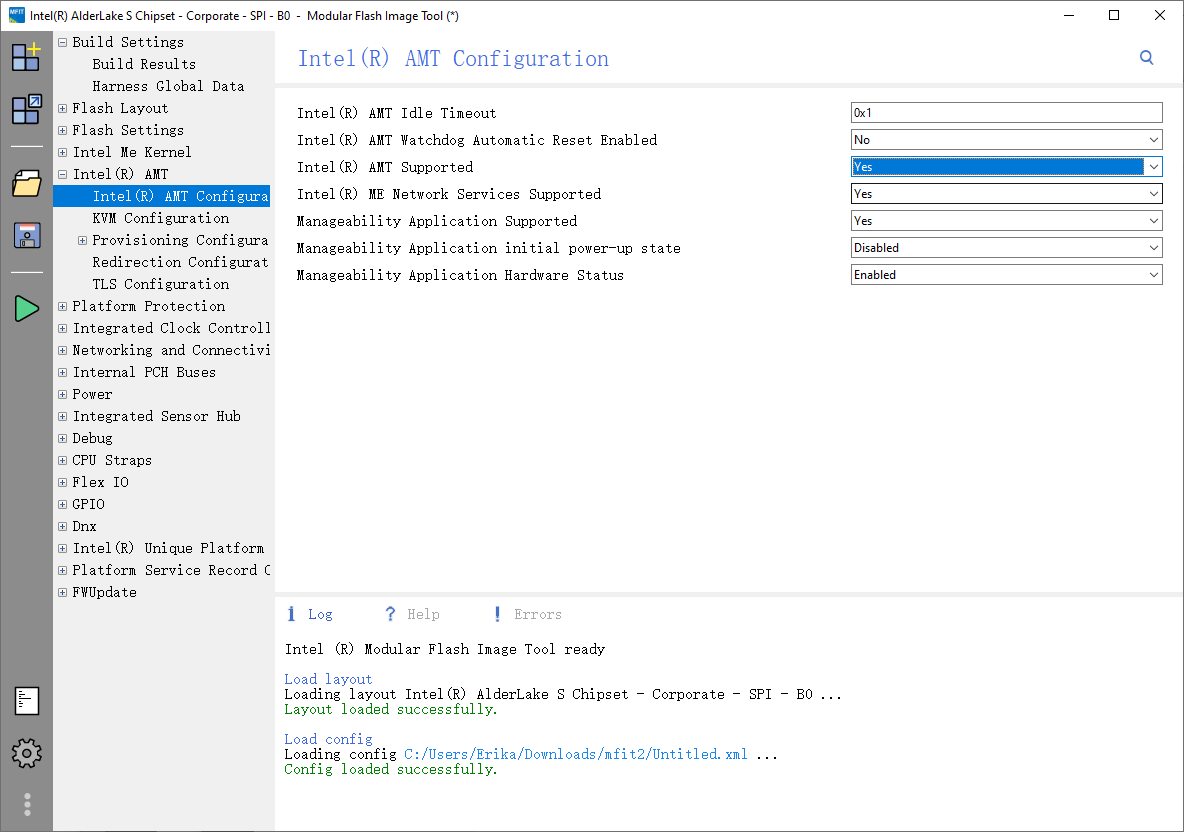
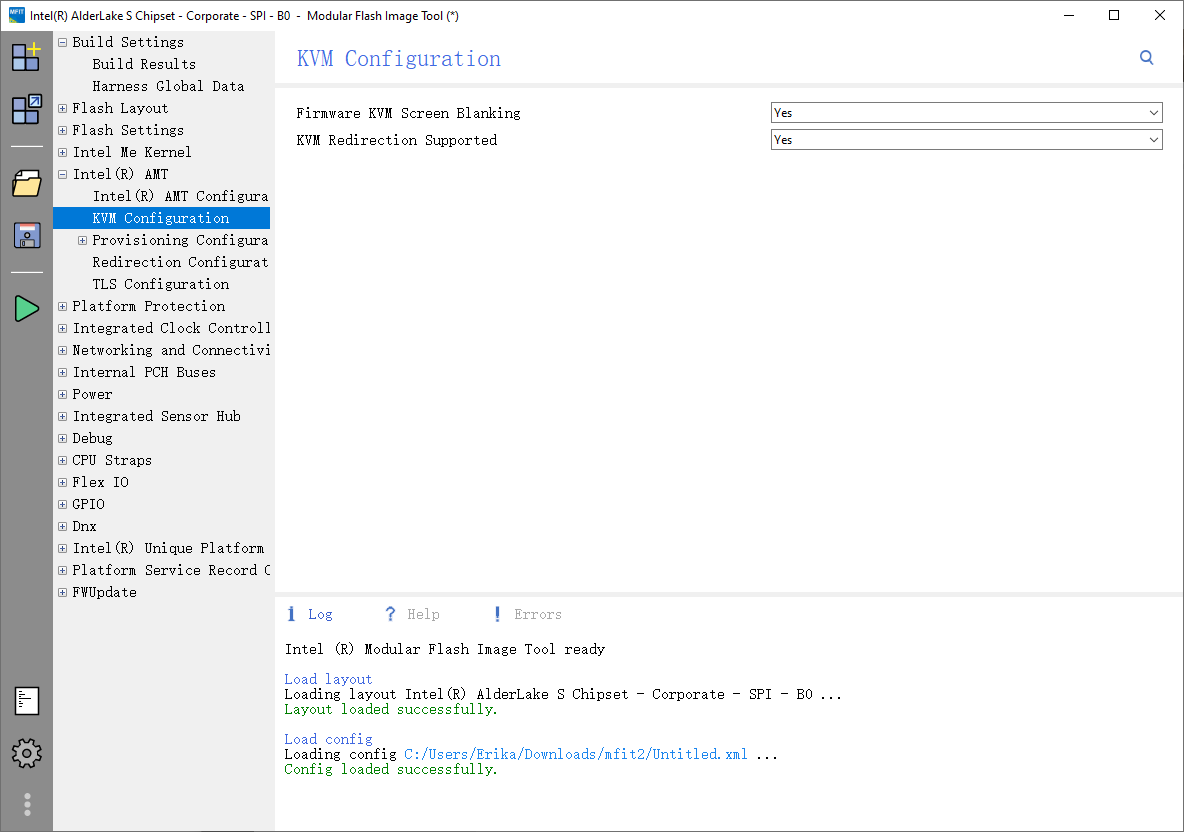
Then, go to Intel(R) AMT settings from the left sidebar and enable all AMT/KVM features as shown in the screenshot below.
We are now ready to go! Click the Build button (green triangle icon) on the left sidebar, and the new image should be successfully built.
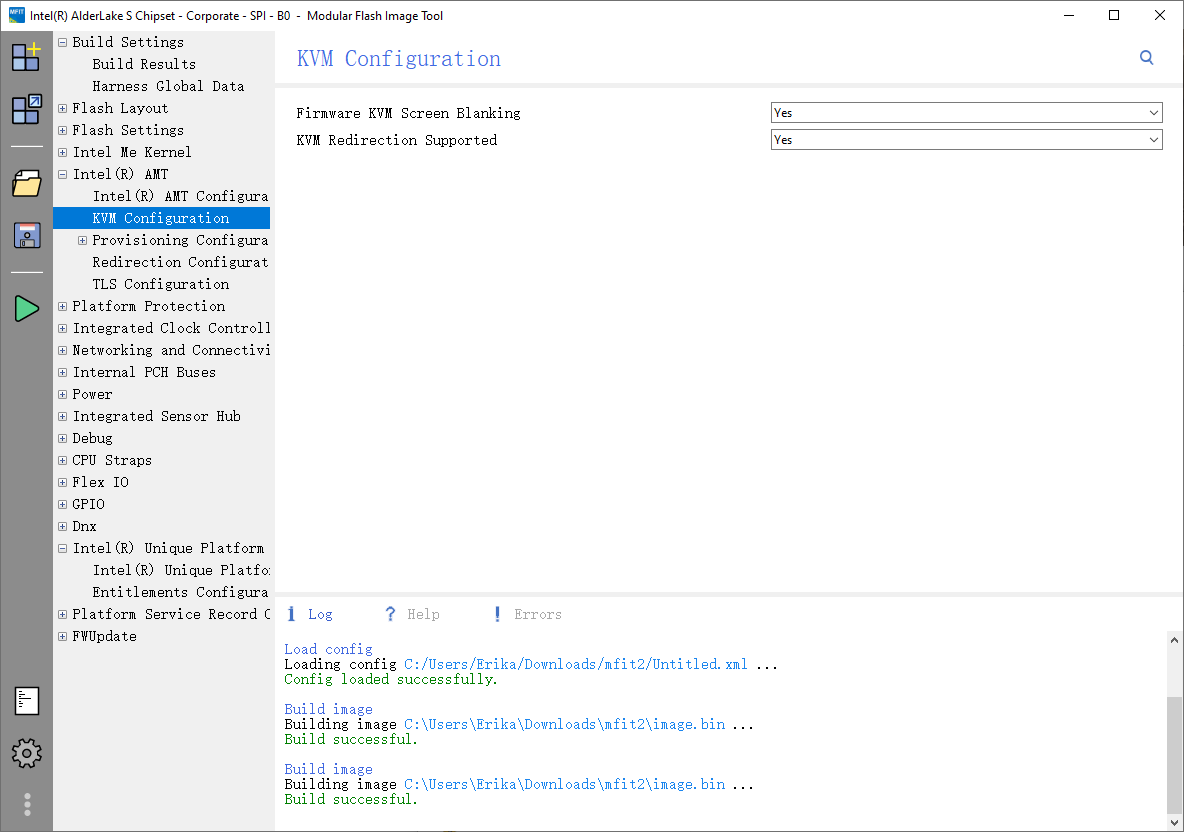
MFit will typically output three files: image.bin (the full new firmware) and two split files, image1.bin and image2.bin. We will only need to flash image1.bin back to the first chip (the SOP8/16MB one in our case).
In fact, if you check the checksum of image2.bin, you will find that the file is identical to our previous dump.
$ sha512sum image2.bin bios-32m.bin
d1c6bdb596d4fc950330d7c423957f5ed52110a4e0bd6fe32b016675837732e05ba73bc4038e67ae8be5f91b1d03cef854ad2aedd33d42228303ee8be04ae666  image2.bin
d1c6bdb596d4fc950330d7c423957f5ed52110a4e0bd6fe32b016675837732e05ba73bc4038e67ae8be5f91b1d03cef854ad2aedd33d42228303ee8be04ae666  bios-32m.bin
1.6 Flash the modded firmware back
sudo flashrom --programmer ch341a_spi -w image1.bin -c "MX25L12835F/MX25L12873F" --progressWriting the firmware might be quicker than you expect. flashrom intelligently compares the new image with the chip's current contents and only updates the differing regions, avoiding a time-consuming full rewrite.
Finally, follow the official KB to reset CMOS/NVRAM. I didn't find the jumpers so I had to disconnect the RTC/BIOS battery on board.
1.7 Enable AMT
After successfully flashing the modified firmware and performing a full system power cycle (including the CMOS reset), the next step is to configure settings in the BIOS. You'll likely need to set a BIOS administrator password (if one isn't already set) to access the MEBx menu.
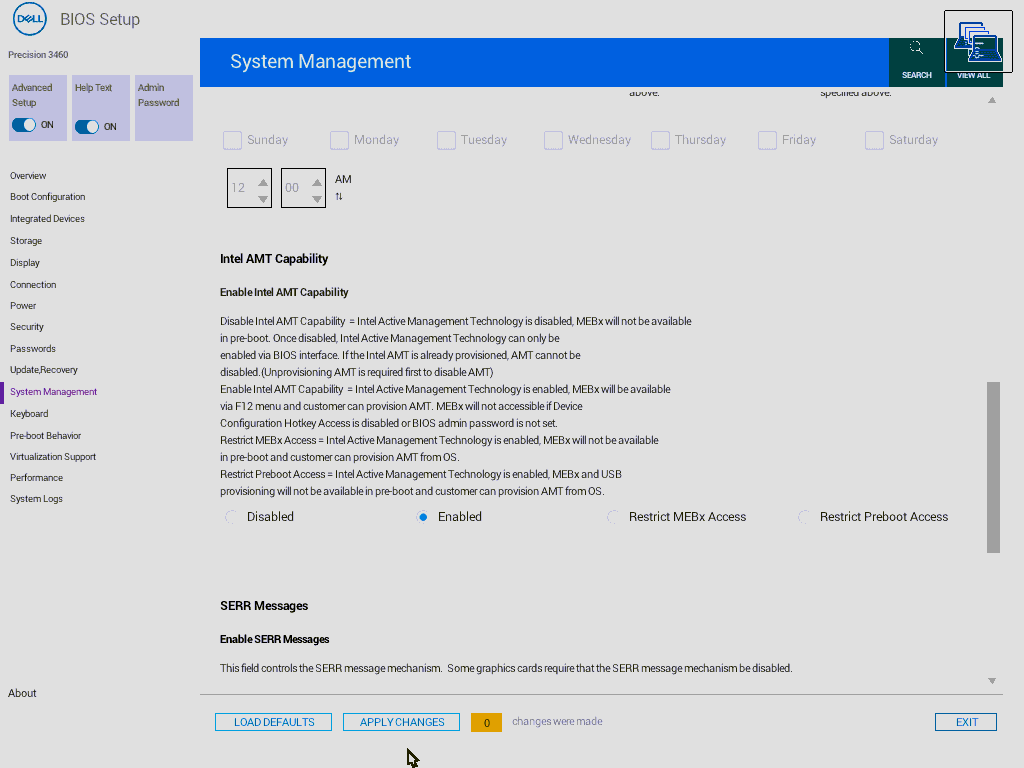
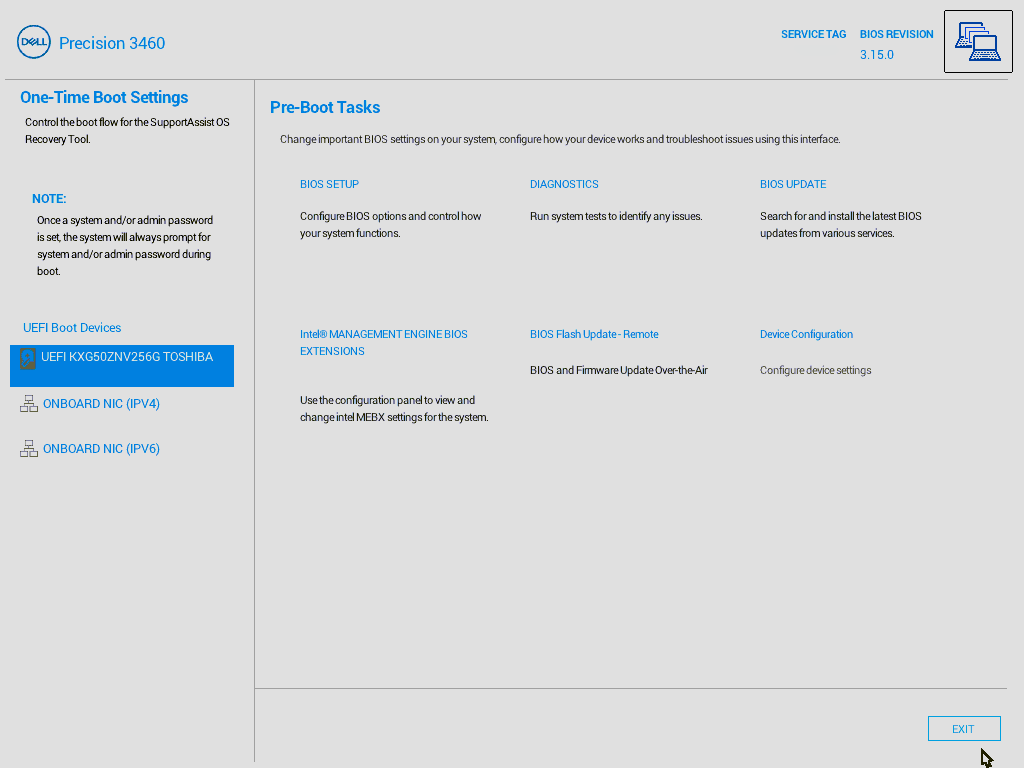
Save your BIOS changes and reboot. During startup, enter your system's one-time boot menu. You should now see an option to enter the MEBx (Management Engine BIOS Extension) setup. Access it to configure AMT parameters (like network settings and passwords). Enjoy your newly unlocked remote management capabilities!
1.8 Reference
- https://winraid.level1techs.com/t/guide-clean-dumped-intel-engine-cs-me-cs-txe-regions-with-data-initialization/31277
- https://winraid.level1techs.com/t/guide-how-to-use-a-ch341a-spi-programmer-flasher-with-pictures/33041
- https://winraid.level1techs.com/t/dell-optiplex-5060-orange-power-led-blink-1-long-2-short/94561
- https://winraid.level1techs.com/t/dell-7080-mff-enable-intel-amt/37870
- https://www.dell.com/support/kbdoc/en-us/000124377/how-to-perform-a-bios-or-cmos-reset-and-clear-the-nvram-on-dell-systems
- https://winraid.level1techs.com/t/problem-inconsistent-dumps-from-ch341a-programmer/106998